
Chapter 13 – Chronic Wasting Disease Herd Certification Programs: 13.5 Appendices
This page is part of the Guidance Document Repository (GDR).
Looking for related documents?
Search for related documents in the Guidance Document Repository
On this page
- Appendix A – Program administration and status assessment by region
- Appendix B – Sampling procedures
- Appendix C – Sanitary precautions and disinfectants
- Appendix D – List of laboratories
Appendix A – Program administration and status assessment by region
| Region | Department/Organization | Regional administrator | Status assessor |
|---|---|---|---|
| Alberta | Alberta Agriculture and Irrigation | Dr. Keith Lehman 780-427-6406 |
Norma Pronteau 780-835-2238 Ashley Stockton-Rice 780-422-4455 |
| Manitoba | Canadian Sheep Federation | Corlena Patterson 1-866-534-1302 |
Julia Patterson 1-866-534-1302 |
| Ontario | Canadian Sheep Federation | Corlena Patterson 1-866-534-1302 |
Julia Patterson 1-866-534-1302 |
| Quebec | Canadian Sheep Federation | Corlena Patterson 1-866-534-1302 |
Julia Patterson 1-866-534-1302 |
| Saskatchewan | Canadian Sheep Federation | Corlena Patterson 1-866-534-1302 |
Julia Patterson 1-866-534-1302 |
| Yukon | Yukon Agriculture Branch | Randy Lamb 1-867-393-7410 |
Randy Lamb 1-867-393-7410 |
British Columbia and the Atlantic provinces currently have no active program.
Appendix B – Sampling procedures
Entire heads may be submitted fresh or frozen to an approved laboratory (see appendix D).
Samples removed by anyone other than an accredited veterinarian or a certified Chronic Wasting Diseases (CWD) sample collector (see definition below) or an approved laboratory (or a Canadian Food Inspection Agency (CFIA) veterinarian/inspector) will not be counted as submitted under the requirements of the Chronic Wasting Disease Herd Certification Programs (CWD HCP).
Certified CWD Sample Collector
An individual who has completed appropriate training recognized by his or her regional administrator on the collection and preservation of samples for CWD testing and on proper recordkeeping, and is certified by his or her regional administrator to perform these activities for farmed cervids for the purposes of the CWD HCP. A certified CWD sample collector may be an accredited veterinarian, an official veterinarian, an approved third party (see definition below) or a cervid farm operator. He/she must operate at arm's length from the owner/cervid farm operator and may not collect samples from his/her own animals. A certified CWD sample collector is responsible for ensuring that, for all cervids presented for sample collection, all identification devices have been verified in situ.
Approved third-party
Approved third parties are approved by the regional administrator as eligible program deliverers, and are trained and qualified to deliver certain aspects of the CWD HCP. Approved third parties may be staff of a provincial/territorial department or agency, an animal health technician who is registered under the appropriate provincial/territorial licensing body and supervised by an accredited veterinarian, and a CFIA veterinarian or inspector. Refer to Section 1.4 Accredited veterinarians, approved third parties and sample collectors of the national standards for more information on approved third parties.
CWD is a reportable disease, and thus if an animal exhibits signs for which CWD is a differential diagnosis, the local CFIA district office can be contacted for sampling.
Both the obex and the retropharyngeal lymph nodes (RPLNs) must be submitted for all farmed cervids tested for CWD under the CWD HCP.
Visualize the approved identification device in situ prior to removing tissues for testing, record all individual animal identification information on the CWD form, and ensure all identification devices (including H of A tags) are submitted with the sample to the laboratory.
Videos of transmissible spongiform encephalopathy (TSE) sampling techniques are available through the Public Health Agency of Canada's training platform. To access the videos:
- visit the public health training website
- choose desired language
- create an account
- fill in your profile
- you will receive an email to complete your registration
- complete the registration using the enrolment key C64A0123
- go to:
- Courses
- Learning Communities
- Canadian Food Inspection Agency (CFIA)
- Animal Health
- Transmissible Spongiform Encephalopathies/Encéphalopathie spongiforme transmissible
Obex harvesting technique
Recommended tools:
- knife for disarticulation of the head (if required)
- rat-toothed forceps
- obex removal knife, spoon (plastic or metal). See figure 1 (the type of plastic spoon available in your area may differ from the one depicted)
- scalpel (optional)
- scissors (optional)
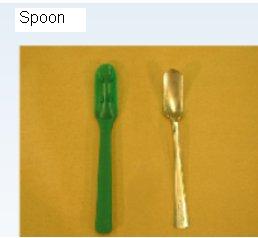
Figure 1 – Examples of obex spoon
2 examples of suitable obex removal devices are shown, plastic (left) and metal (right).
When removing the head from the body, all the flesh, including the spinal cord, should be cut cleanly 15 cm (6 inches) from the head.
- 1. Place the cervid head upside down (dorsal side down) with the nose pointing away from you and the foramen magnum facing you on a clean, disinfected surface (see figure 2).
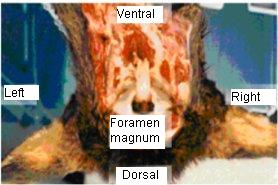
Figure 2 – Cervid head, dorsal side down for correct orientation
Post mortem head of a cervid is shown with the top facing down to indicate the best orientation to access the obex through the foramen magnum.
- 2. Using the forceps, grasp the dura mater (which is the thick lining around the spinal cord). With the scissors, make a single cut down the centre line to form 2 flaps.
- 3. Remove the congealed blood from around the spinal cord.
- 4. Use the forceps to hold the dura. Sever the cranial nerves from the spinal cord. This can be done with a scalpel, an obex knife, or carefully with scissors (as shown in figure 3) by moving the instrument gently around the cord.
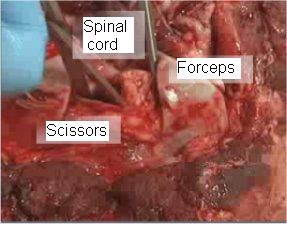
Figure 3 – Severing the attachments to free up the spinal cord
Close up of the foramen magnum on a post mortem cervid head is shown to indicate the technique for severing cranial nerves before obex removal.
- 5. This is the most important step in freeing up the spinal cord. The cord must be completely free from attachments by cranial nerves in all directions. If some cranial nerves are left attached, a portion of the obex will remain with that cranial nerve and be pulled off your sample.
- 6. Once the brain stem and spinal cord are free from cranial nerve attachments, turn the head so that it is dorsal side up on the table. Insert the spoon or spatula into the cerebral canal. Advance it cranially as far as you can until the tip lodges against parts of the skull and comes to rest between the cerebellum and the brain stem (see figure 4).
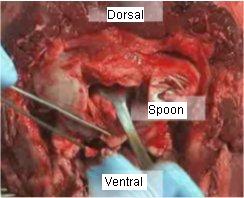
Figure 4 – Head turned – dorsal side up, advancing the collection spoon into the canal for obex removal
Close up of the foramen magnum on a post mortem cervid head is shown to indicate the technique insertion of the obex removal device.
- 7. Use your index finger to place downward pressure on the handle of the obex tool, and rotate the tool back and forth to sever the brain stem.
- 8. Keep the tip of the obex tool down and drag the tool backwards, gently bringing the severed portion of the brain stem with it. The obex is recognizable as a V-shaped depression (see figure 5).
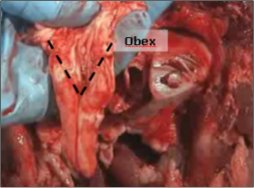
Figure 5 – Obex
A properly removed obex section of the brainstem is shown. Special attention is given to the anatomically distinct region shaped like a "V" on the ventral side of the brain stem indicating the obex region has been obtained in the sample.
Contact the laboratory to request information on specimen submission (fresh or frozen), and ensure that all the individual animal's identification devices/tags are submitted with the sample to the approved laboratory.
Retropharyngeal lymph node harvesting technique
Recommended tools:
- medium-sized boning knife
- rat-toothed forceps
- scissors (optional)
The following is one suggested removal technique to harvest a set of RPLNs. For orientation, the lymph nodes depicted in this appendix are the medial RPLNs, and lie deep and between the base of the larynx (windpipe) and the floor of the skull. They are "buried" in an area of whitish connective tissue on either side of the pharynx and upper neck and jaw.
- 1. Place the cervid head upside down (dorsal side down), with the nose pointing away from you, and with the foramen magnum facing you, on a clean, disinfected surface (see figure 6).

Figure 6 – Post mortem head of a Cervid, dorsal side down for correct orientation
Post mortem head of a cervid is shown with the top facing down to indicate the best orientation to access the retropharygeal lymph nodes.
- 2. With a medium-sized boning knife, make the first incision, going straight upwards, from just above the foramen magnum to the surface (and through the skin if not skinned) (see figure 7).
- 3. Make a second cut, extending from where the first cut began, staying close to the base of the skull and moving the knife down and to the right as if you were boning out the tissue (see figure 7).
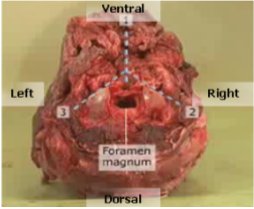
Figure 7 – Location of the necessary cuts to access the buried RPLNs
Post mortem head of a cervid is shown with the top facing down to indicate the best orientation to access the retropharygeal lymph nodes. 3 dashed lines are shown superimposed over the head indicating the cut lines to make to access the retropharyngeal lymph nodes.
- 4. Make the third cut, starting at the same spot above the foramen magnum and going down and to the left, staying close to the skull (see figure 7).
- 5. After pulling back/reflecting the 2 flaps created, notice an area of white connective tissue and fat on either side of the cut. The RPLNs are fairly large, firm, and encapsulated in the white fibrous tissue (see figure 8).
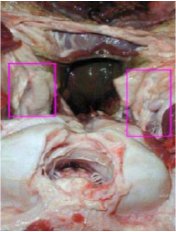
Figure 8 – Location of buried RPLNs
Close up image of a post mortem cervid head is shown with the retropharyngeal lymph nodes exposed.
(Photo courtesy of Ministère de l'Agriculture des Pêcheries et de l'Alimentation du Québec [MAPAQ].)
- 6. Bluntly dissect out the beige-coloured, firm nodular lymph nodes buried in the white connective tissue, using your gloved fingers and/or a pair of scissors (see figure 9).

Figure 9 – Beige RPLNs after dissection from the connective tissue capsule
Close up image of a post mortem cervid head is shown with the retropharyngeal lymph nodes exposed. The right retropharygeal lymph node is held between the fingers of the sampler and demonstrates the lymph node's appearance to differentiate it from other glandular tissue nearby.
Contact the laboratory to request information on specimen submission (fresh or frozen), and ensure the individual animal's identification devices/tags are submitted with the sample to the approved laboratory.
Appendix C – Sanitary precautions and disinfectants
Chronic wasting disease (CWD) is not considered a human pathogen; however, normal sanitary precautions against a possible range of pathogens should be taken. Wear protective clothing, gloves, and face protection when collecting brain specimens. Always avoid direct contact with brain tissues. Personnel at tissue harvesting sites should take precautions to avoid ingesting the agent.
It is recommended that you place the animal's head on a disposable plastic drop sheet. This sheet should be large enough to cover the work area.
Chemical decontamination of equipment and work surfaces with sodium hypochlorite (NaOCl) at a concentration of 2% available chlorine, or sodium hydroxide (NaOH) at a concentration of 2 molar, is recommended. Surfaces and equipment should be left wet (or soaking) with NaOCl or NaOH for at least 1 hour at 20°C.
NaOH can be purchased from Fisher Scientific in crystal form. To make a 2 molar concentration of NaOH, dilute 80 grams NaOH crystals in 1 litre of water and stir well.
or
NaOCl can be prepared from industrial grade or commercially available bleach (such as Javex/Clorox). Dilute the bleach to provide a final concentration of 2% (20,000 ppm) available chlorine. For example, most commercially available bleaches have 6% available chlorine listed on the label. In this case, mix 1 part bleach and 2 parts water (ratio 1:2) to attain the 2% concentration of available chlorine.
Bury or incinerate used disposable protective clothing, gloves, and animal remains.
It is recommended that neurosurgical tools be soaked in NaOH for 1 hour, removed from the solution, and then wiped with the NaOCl solution for 10 seconds. Dry the tools, as the NaOCl is corrosive.
Note on prion disinfection
Other traditional disinfectants, such as Virkon, are not effective against prion agents. Instruments must be disinfected with either sodium hypochlorite or sodium hydroxide.
Appendix D – List of laboratories
National TSE Laboratory Network laboratories for CWD testing
Alberta Agriculture and Irrigation
TSE Laboratory
6909 – 116th Street
Edmonton, AB T6H 4P2
Telephone: 780-415-4516
Facsimile: 780-415-4527
Ministère de l'Agriculture des Pêcheries et de l'Alimentation du Québec (MAPAQ) – (French only)
Laboratoire de santé animale
3220 Sicotte Street
Saint-Hyacinthe, QC J2S 2M2
Telephone: 450-778-6542 (ext. 5800)
Facsimile: 450-778-6535
Ontario Ministry of Agriculture, Food and Rural Affairs (OMAFRA)/University of Guelph
Animal Health Laboratory
Laboratory Services Division
University of Guelph
Building 89, 419 Gordon Street,
Guelph, Ontario, N1G 2W1
Telephone: 519-824-4120 (ext. 54530)
Facsimile: 519-827-0961
Saskatchewan Ministry of Agriculture/University of Saskatchewan
Prairie Diagnostic Services
Rm. 2604 Diagnostic Immunology Laboratory
52 Campus Dr.
Saskatoon, SK S7N 5B4
Telephone: 306-966-7316
Facsimile: 306-966-2488
Note on CWD
CWD is a reportable disease, and thus if an animal exhibits signs for which CWD is a differential diagnosis, the local CFIA district office can be contacted for sampling.
- Date modified: