
Nursery Sector Biosecurity Guide
Preface
This Nursery Sector Biosecurity Guide (the Guide) has been developed as a supporting document to the National Voluntary Farm-Level Biosecurity Standard for the Greenhouse, Nursery and Floriculture Sectors (the Standard) to assist producers in developing a biosecurity plan. The Standard contains biosecurity measures of relevance to all three sectors. This Guide is voluntary and provides sector-specific biosecurity measures for consideration to help nursery producers achieve the pest risk mitigation goals identified in the target outcomes previously set within the Standard.
It is recognized that each biosecurity plan will be specific to each nursery and not all the recommendations in this Guide will be universally applicable. The information and guidance provided apply to both established and new nurseries. The considerations outlined in this Guide are based on scientifically sound principles. Implementing the considerations will help reduce the risk of pest introduction, help enhance pest management within a nursery and mitigate the spread to additional nurseries and to the surrounding landscape.
For the purpose of this Guide, pest is defined as any living organism injurious to plants, plant products or by-products, which include insects, mites, diseases, vermin, animals and weeds.
How to Use this Guide
i) Organization of this Guide
This Guide has been organized into the following three main sections:
- Education, Training and Communication
- Nursery Operational Management
- Crop Health Management in Production Stages
These main sections are divided into sub-sections that include the:
- Target outcome – Goals that all producers should try to achieve to protect their nursery from the introduction and spread of pests. These are taken from the Standard and refer to the "place of production". Except in the target outcomes, this Guide uses "nursery" instead of "place of production".
- Benefits – Details regarding why a specific target outcome is important to on-farm biosecurity.
- Considerations – Examples, guidance and suggestions for each target outcome.
- Self-evaluation assessment – A tool to determine if additional biosecurity measures can be applied within a nursery. A checklist has been provided at the end of each sub-section.
A footnote has been provided in the title of each sub-section as the order and titles of the sub-sections in this Guide differ from the Standard. The footnote indicates the corresponding sub-section of the Standard.
Section 6.0 of this Guide is a glossary of definitions. Terms that are included in the glossary have been written in bold and italic text in their first use in the document.
Appendices 1 to 5 are located at the end of this Guide and provide examples of tools that can be used to implement biosecurity measures in a nursery, such as signs and a visitor sign-in sheet.
Appendix 6 is a list of resource documents from sector associations, the Canadian Food Inspection Agency (CFIA) and the federal government.
Appendix 7 is an acknowledgement of the sector associations, producers, academia, and federal and provincial specialists whose expertise was used to develop this Guide.
ii) How to Complete the Self-Assessment Checklists
The self-assessment checklists have been provided to assist producers in assessing if additional biosecurity measures can be implemented in a nursery. The biosecurity measures from the Considerations have been included in the self-assessment checklist. Each biosecurity measure has been categorized as routine or advanced, with advanced measures written in bold text.
There are four columns included in the checklist to indicate:
- Yes – Biosecurity measure is implemented and does not require further action.
- Sometimes – Biosecurity measure is not always successfully implemented and may require additional action.
- Never – Biosecurity measure is not implemented and requires action.
- Not applicable (NA) – Biosecurity measure does not apply to the nursery and no action is required.
iii) Self-Assessment Checklist and Action Work Plan PDF Document
The Nursery Sector Biosecurity Guide Self-Assessment Checklist and Action Work Plan is a list of the biosecurity measures from the self-assessment checklists included in each sub-section with the same four columns as explained above. This tool also includes an action work plan where actions to complete the implementation of additional biosecurity measures within a nursery can be recorded. When completed electronically, the biosecurity measures that "Never" and "Sometimes" have been selected are automatically transferred to the action work plan. This tool can be downloaded from the forms catalogue on the Canadian Food Inspection Agency’s (CFIA) website. In the "Filter items" search field, type "5800" to obtain the form.
Acknowledgement
With permission from Landscape Ontario, information from the Landscape Ontario document Practical Integrated Pest Management: A Framework for Pest Management in Nursery Crop Production has been used to develop this Guide.
1.0 Introduction
1.1 The Importance of Biosecurity
Biosecurity is a set of practices used to prevent, minimize and manage the transmission of pests including their introduction, spread and release. Implementing and enhancing biosecurity measures within a nursery will help protect both individual and sector-wide economic interests. Risks to nurseries may develop rapidly and easily spread to other nurseries or the surrounding landscape due to the intensive nature of production, limited genetic diversity within crops and the movement of people and materials. Producers will benefit from awareness of the risks and the measures that can be implemented to minimize the risk of pest introduction and spread.
1.2 Biosecurity Concepts
Biosecurity ConceptsFootnote 1
Target Outcome
Implementation of biosecurity measures at critical points in pathways of pest transmission.
Implementing biosecurity measures can be effective not only for mitigating the spread of pests but also for preventing the introduction of new and unknown pest risks. Applying biosecurity measures depends on an analysis of the risks and pathways of pest transmission for a nursery. The risks to a nursery will vary depending on several factors, such as the type of crop grown, the source(s) of propagative material, the region, the climate and the production practices.
Knowledge of pests and their pathways of transmission is important when developing a biosecurity plan. With this knowledge, pest vectors can be managed and biosecurity measures can be applied to interrupt pathways of pest transmission to reduce crop damage and minimize economic losses. Pathways of pest transmission include:
- Biological vectors such as incoming plants, insects (including beneficial insects) and people.
- Physical vectors such as equipment.
- Environmental vectors such as wind and surface water.
To determine the critical points in the pathways of pest transmission for a nursery where biosecurity measures may be applied, a risk assessment may be conducted. This risk assessment should examine all steps in nursery production from the location and layout of a nursery to shipping finished product. Appendix 1 is taken from the Clean Plants Nursery Manual and is an example of a risk assessment tool.
In addition, as illustrated in Figure 1, pest outbreaks do not happen in isolation but are dependent on the interrelated nature of the crop, the environment and the pest.
- Crop health: If the crop is not healthy and under stress the plant can be more susceptible to pests. However, if the plants are healthy this does not eliminate pest issues.
- Pests: Many pests can thrive in optimal crop growing conditions.
- Environment: The environment is important to the development of the crop and the pest.
Figure 1: The Plant Pest Triangle
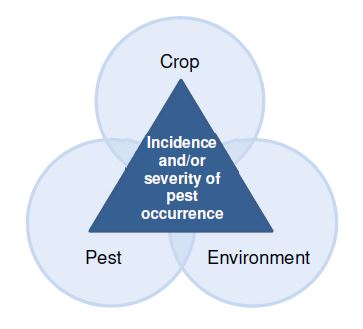
Description for photo - Figure 1: The Plant Pest Triangle
The Plant Pest Triangle has a triangle with the words "Incidence and/or severity of pest occurrence" written on it. Each point of the triangle has a circle surrounding it. Starting at the top, the first circle says: Crop. To the right, the second circle says: Environment. To the left, the third circle says: Pest.
The Plant Pest Triangle shows that the incidence and severity of an outbreak relates to the interaction of a susceptible crop, a pest, and an environment favourable to pest development. In addition to applying biosecurity measures at critical points in the pathway of transmission, pests may also be mitigated through the application of biosecurity measures to reduce the risks presented by these three components. For example, a producer may choose to grow tolerant plant varieties or manage the environment.
1.3 Benefits of a Biosecurity Plan
One benefit of a biosecurity plan is that it can provide producers with the less costly option of preventing rather than managing the introduction or spread of pests. If a pest is detected, there are protocols already in place to facilitate a rapid response, thereby minimizing the damage or further spread of pests. Other benefits of incorporating biosecurity measures into the day-to-day activities of a nursery include:
- Managing the risk of business interruption due to harmful pest detections.
- Meeting customer and consumer demand for biosecurity measures and protocols.
- May assist in attracting new markets.
- Decreased production losses.
- Avoiding the introduction of pests that are currently not present.
- The ability to contain and minimize pests that are already present.
- Breaking the cycle of pest transmission from one nursery to another, to the wider community and between trading partners.
It is preferable to prevent rather than manage the introduction or spread of a pest within a nursery.
1.4 Elements of a Biosecurity Plan
Biosecurity plans will differ from one nursery to another, as biosecurity measures and requirements will vary depending on the nursery. A biosecurity plan may include a detailed farm map(s), training programs, and standard procedures for pest response and the movement of people, vehicles and equipment. Documenting these procedures can ensure consistent application and demonstrate to customers that a nursery operates under biosecurity measures.
Other programs such as the Clean Plants Nursery Manual may already be used within a nursery and have components that apply to biosecurity. These programs can be referenced as part of a biosecurity plan.
To develop a biosecurity plan, consider the following process:
Step 1: Develop a detailed map of the nursery. A map can be useful for visualizing and identifying potential sources or pathways of pest transmission. A map may include the entrance, shipping area, receiving area and biosecurity zones. The flow of plant material, people and equipment within the nursery can also be included.
Step 2: Identify the risks to a nursery. Knowledge of pests and their pathways of transmission can help to identify the risks and biosecurity measures that can help mitigate pests. Appendix 1 is an example of a risk assessment tool.
Step 3: Review current biosecurity measures. The self-assessment checklists and the Nursery Sector Biosecurity Guide Self-Assessment Checklist and Action Work Plan can be used to help identify additional biosecurity measures that may be implemented at a nursery.
Step 4: Identify biosecurity goals. Prioritize and establish a timeline for the implementation of the additional biosecurity measures identified after completing the self-assessment checklists or the Nursery Sector Biosecurity Guide Self-Assessment Checklist and Action Work Plan.
Step 5: Develop an implementation strategy. Communication, education and training of employees and visitors of a nursery are an important part of the implementation strategy.
Step 6: Review and update the biosecurity plan. A biosecurity plan should be regularly reviewed and updated as new biosecurity information becomes available or if there are changes within a nursery.
1.5 Implementing a Biosecurity Plan
As seen in Figure 2, the implementation of biosecurity measures in a nursery is a cycle of biosecurity activities. The cycle of assessing and re-assessing leads to a more proactive approach.
Figure 2: Cycle of biosecurity activities
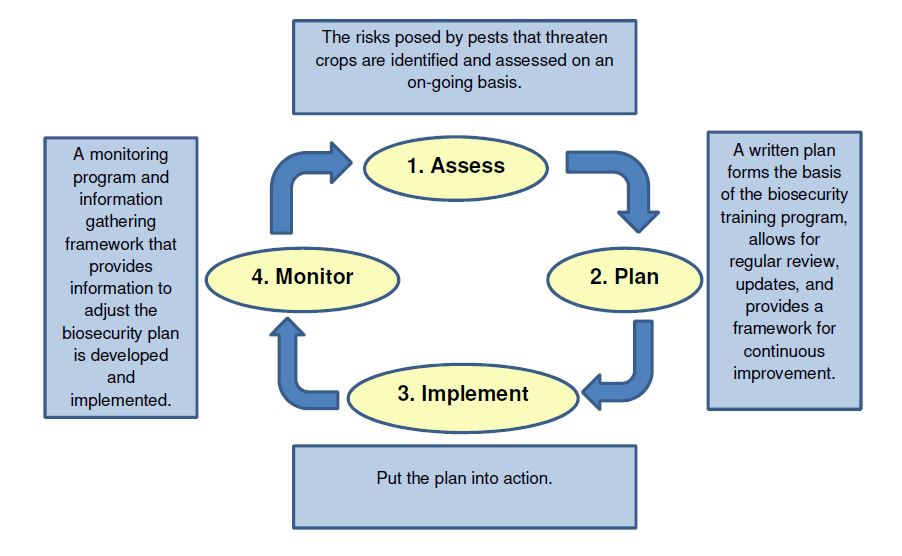
Description for photo - Figure 2: Cycle of biosecurity activities
Figure 2 is an illustration of the cycle of activities that should be completed to develop and implement a biosecurity plan. The cycle of biosecurity activities has four items in the centre with arrows pointing between them in clockwise direction. The first item at the top of the cycle is Assess. Moving clockwise, the second item is Plan, the third item is Implement and the fourth item is Monitor. There is a text box by each of these items in the cycle (four in total). Above the word Assess there is a box with the following text: The risks posed by pests are identified and assessed on an on-going basis. To the right of the word Plan there is a box with the following text inside: A written plan forms the basis of the biosecurity training program, allows for regular review, updates and provides a framework for continuous improvement. Below the word Implement is a text box with the following text inside: Put the plan into action. To the left of the word Monitor is a text box with the following text: A monitoring program and information gathering framework that provides information to adjust the biosecurity plan is developed and implemented.
Assess: Identify and assess the risks of pest introduction and analyze their pathways of transmission. This will allow for current biosecurity gaps within a nursery to be addressed. Production practices should be reviewed frequently (re-assess) to ensure that implemented measures are effective in relation to pest prevention and control.
Plan: A written biosecurity plan is highly recommended. A written plan allows for regular review and updates, facilitates continuous improvement within the nursery, and forms the basis for training.
Implement: Put the plan into action. Education, training and communication are key to implementing a biosecurity plan.
Monitor: A monitoring program is developed and implemented for the early detection, identification and ongoing monitoring of pests. It is important that the design, effectiveness and implementation of a biosecurity plan be assessed not only on a routine basis but also when changes in nursery practices or biosecurity risks occur.
2.0 Education, Training and Communication
Education, Training and CommunicationFootnote 2
Target Outcome
People entering or working within a place of production respect the biosecurity measures in place.
Benefits: Employees are one of the most important elements when implementing a biosecurity plan, as nearly all biosecurity measures will be executed by employees during their day-to-day work activities. A training program that is well-developed, communicated and implemented helps provide employees with an understanding of the importance of proactive biosecurity. In addition, visitors will frequently require access to the nursery. Communicating the necessary biosecurity measures to visitors will help mitigate the risk of pest introduction and spread during their visit.
Make biosecurity a part of your business culture.
Considerations
- Include employees in the process to design the biosecurity plan to increase their "ownership" of the plan, which may help with implementation.
- Incorporate biosecurity measures and protocols into the training program.
- Use signs and visual aids to communicate biosecurity measures within the nursery. Refer to Appendix 2 for examples of signs.
- Use plain language in education and communication materials and on signs.
- Provide information in the appropriate language(s) for employees. When necessary, translate signs, education and communication documents.
- Provide employees with training in crop production practices, identification and symptoms of pests of concern, as well as the process for reporting suspected pest detections to trained individuals at the nursery.
- Pest fact sheets, information sheets and posters may be hung in common areas to help employees identify pests of concern.
- Provide employees with a general understanding of the pathways of pest transmission to help them implement the necessary biosecurity measures to mitigate the risks of pest introduction and spread throughout their day-to-day activities.
- Not all employees require training on all biosecurity measures. Designated employees may be given detailed training to confirm pest identification and decide pest control measures.
- Monitor, review and update the biosecurity plan and training program as situations change and new information becomes available.
- Schedule and implement periodic training and awareness updates with employees.
- Ensure visitors are aware of and respect the biosecurity measures for the areas of the nursery they visit. Templates and/or checklists may be used to verify that biosecurity measures have been completed.
Education, Training and Communication Self-Assessment Checklist
| Biosecurity Measure | Yes | Sometimes | Never | Not Applicable |
|---|---|---|---|---|
| Employees are included in the process to design the biosecurity plan. | ||||
| Biosecurity measures and protocols are incorporated into the training program. | ||||
| Signs and visual aids are used to communicate biosecurity measures. | ||||
| Plain language is used in education and communication materials, as well as on signs. | ||||
| Signs, education and communication documents are provided in the appropriate language(s) for employees. | ||||
| Employees are trained in crop production practices, identification and symptoms of pests, as well as the process for reporting a pest detection. | ||||
| Pest fact sheets, information sheets and posters are hung in common areas to help employees with pest identification. | ||||
| Employees are trained to know the general pathways of pest transmission. | ||||
| Training is provided to employees who are designated to confirm pest identification and pest control measures. | ||||
| The biosecurity plan and training program are regularly reviewed and updated. | ||||
| Periodic training and awareness updates are provided for employees. | ||||
| Visitors are made aware of biosecurity measures for the areas of the nursery they will visit. | ||||
| Templates and/or checklists are used to verify visitors complete required biosecurity measures. |
3.0 Nursery Operational Management
Nursery Operational ManagementFootnote 3
Nursery operational management is fundamental to the development and implementation of a biosecurity plan. Assessing the risks associated with the activities that take place at the nursery is necessary. Potential biosecurity risks can originate from the location; the movement of people, vehicles and equipment; as well as production inputs and outputs.
3.1 Nursery Location and Layout
Nursery Location and LayoutFootnote 4
Target Outcome
Knowledge of the location and layout is used to evaluate new sites and to protect existing or neighbouring sites.
Benefits: The landscape and properties surrounding a nursery are potential sources of pests. When choosing a location and designing the layout of a nursery, consideration of the surrounding area can help mitigate pest introduction and spread to a nursery. Knowledge of crop movement and work patterns may also be helpful in designing the layout of a nursery. A map that illustrates the surrounding areas and the location of high risk areas can help assess the pathways of pest transmission and identify the critical points where biosecurity measures may be applied. The ability to illustrate the layout of a nursery can also assist in training new employees, directing visitors and planning future production processes. Integrating this knowledge can provide a solid foundation for developing and implementing a biosecurity plan.
Considerations
Geography and environmental factors
- For plants that will be grown in open fields, conduct an assessment of the cropping history and previous use of newly acquired or leased land. This will provide knowledge of the potential sources of pests of concern, information on the potential build-up of chemical control products, as well as the range of pest control products and fertilizer used.
- Make risk management decisions for site selection based on neighbouring activities such as type of crop in production, timing of harvest, composting practices or the importation of produce, as these activities may be potential sources of pest introduction.
- Be knowledgeable of the regulated and non-regulated pests that occur in the area, including invasive plants. Knowing the pests that are present in the area will help assess the risks to a nursery and implementation of the correct biosecurity measures.
- Within surrounding properties, treatment or removal of plant species that are invasive or potential pest vectors or hosts may be required.
- Assess soil and container media characteristics for suitability to various nursery crops.
- Make use of topography to assist with drainage and reduction of standing water in production areas. Drainage patterns and surface water movement can affect pest introduction and spread. For example, pathogens that cause root rots and other pests can be spread in areas of poor drainage where standing water occurs.
Layout
- Develop a map of the nursery that illustrates indoor and outdoor activities. The map may include the soil types, crops, irrigation system, drainage, prevailing wind directions, composting areas, propagation areas, production areas, shipping area, receiving area, high risk areas and the flow of plant material.
- Production and propagation areas should be considered high-risk areas for pest introduction as the plants are more susceptible to pests than others. Designate separate areas for production and propagation.
- Locate designated receiving areas for inspection of inputs away from production areas. The receiving area should also allow for cleaning and treatment of the area, if necessary.
- Locate the segregation area, also referred to as an isolation or quarantine area, away from the production area(s). Temporarily store plants purchased from external sources in this area for inspection. Plants can be moved to the production area once it is determined they are not infested with pests of concern.
- Designate separate areas for shipping and receiving to reduce the risk of pest spread from inputs to finished product. If the shipping and receiving areas are the same, biosecurity measures such as separation by timing may be used so that inputs and finished product are not in the area at the same time.
- Locate designated areas for composting crop waste and for storing manure, growing media or compost away from propagation and production areas to prevent pest re-introduction and spread. Consider wind direction and surface drainage when locating composting areas to minimize the risk of re-introducing pests to production areas.
- Locate washing facilities for cleaning and disinfecting equipment and vehicles in an area that mitigates pest introduction and spread. Consider the capacity for water supply, waste water collection and disposal.
- Consider pathways of pest transmission when designing new structures and production areas. For example, install stainless steel benches that can be easily disinfected instead of wood.
Location and Layout Self-Assessment Checklist
| Biosecurity Measure | Yes | Sometimes | Never | Not Applicable |
|---|---|---|---|---|
| For newly acquired or leased land, information is gathered on the cropping history and previous land use. | ||||
| Sites are selected using risk management decisions based on neighbouring activities. | ||||
| Awareness of regulated and non-regulated pests that occur in the area. | ||||
| Invasive plants or potential pest vectors within surrounding areas are treated or removed. | ||||
| Soil and container media characteristics are assessed for suitability to various nursery crops. | ||||
| Optimal water drainage and surface water movement are ensured to prevent pest introduction and spread. |
| Biosecurity Measure | Yes | Sometimes | Never | Not Applicable |
|---|---|---|---|---|
| There is a detailed map of the nursery. | ||||
| The layout of the nursery is designed to minimize the potential for pest movement. | ||||
| The layout is designed to optimize plant movement between the different stages of production, from propagation to shipping. | ||||
| Separate areas are designated for production and propagation. | ||||
| Separate areas have been designated for shipping and receiving. | ||||
| Receiving areas are located away from production areas. | ||||
| An area has been designated as the segregation area. | ||||
| Areas for composting crop waste and for storing manure, growing media or compost are located away from propagation and production areas. | ||||
| Pathways of pest transmission such as wind direction have been considered to locate compost area. | ||||
| Equipment and vehicle washing facilities are located in an area that prevents pest introduction and spread. | ||||
| Pathways of pest transmission are considered when designing new structures and production areas. |
3.2 Biosecurity Zones
Biosecurity ZonesFootnote 5
Target Outcome
Controlled Access Zones (CAZs) and Restricted Access Zones (RAZs) are established and communication protocols which explain the importance of these areas within the place of production are implemented.
Benefits: Biosecurity zones are used to identify and control access to high risk areas of the nursery. Some nurseries use the terms Controlled and Restricted Access Zones to label biosecurity zones, while other nurseries use the term high-risk area. This Guide will use the term high-risk area. A high-risk area is an area that requires additional biosecurity measures to prevent the spread of pests either into or out of an area. An area can be identified as high risk if:
The area, such as a segregation area, is used for a high-risk activity such as monitoring plant material from external sources for pests or containing plants infested with a pest of concern.
OR
The plants in an area are more susceptible than others to pests such as mother plants or propagative plant material.
The level of biosecurity measures applied will be consistent with the risk of pest introduction or spread associated with each zone or area. The common biosecurity measures used include separation from other production areas by a buffer zone or physical separation and signs to restrict access.
Considerations
- Access to high-risk areas is restricted to authorized personnel and is controlled by signs, locked gates or doors. Signs should be posted at entry points to advise people that the area is high risk and that access is restricted. Refer to Appendix 2 for examples of biosecurity signs.
- Plan the flow of work, people, vehicles and equipment through the nursery to minimize the risk of pest spread between crops. This flow will depend on the biosecurity risks present in each area of the nursery.
- Indicate high-risk areas and the flow of work, people, vehicles and equipment on the nursery map.
- Employee training programs should include the flow of work, people, vehicles and equipment in the nursery.
- Clean and disinfect equipment that is moved into or out of a high-risk area when necessary.
- Provide hand wash and footbath stations, as well as disposable or dedicated outerwear and footwear at entrances and exits of high-risk areas.
| Biosecurity Measure | Yes | Sometimes | Never | Not Applicable |
|---|---|---|---|---|
| Areas of the nursery have been designated as high risk. | ||||
| Signs are used to inform people of high-risk area(s). | ||||
| Entry to the high-risk area(s) is controlled by locked doors in the greenhouse areas and gates and/or fencing in field production areas. | ||||
| Flow of work, people, vehicles and equipment is designed to minimize the risk of pest spread between crops. | ||||
| Protocols are in place for work, people, vehicles and equipment when working in a high-risk area(s). | ||||
| High-risk area(s) and flow of work, people, vehicles and equipment are indicated on the nursery map. | ||||
| Employee training program includes the flow of work, people, vehicles and equipment. | ||||
| Equipment is cleaned and disinfected when moved into or out of a high-risk area(s). | ||||
| Hand wash stations, footbaths and disposable or dedicated outwear and footwear are provided at entrances and exits of high-risk area(s). |
3.3 Movement of People, Vehicles and Equipment
Movement of People, Vehicles and EquipmentFootnote 6
Target Outcome
The movement of people, vehicles and equipment do not introduce or spread pests within a place of production.
Benefits: Pests can be moved into the nursery and between production areas by people, vehicles and equipment. Managing the movement of people, vehicles and equipment by designating routes, assessing risk, as well as implementing cleaning and disinfecting when necessary can help mitigate the risk of pest introduction and spread. For further information regarding cleaning and disinfecting, refer to section 3.4 Maintenance of Facilities and Property. It is important to assess the risk of the movement of people, vehicles and equipment to determine the appropriate biosecurity measures that may help mitigate pest risk.
Considerations
Movement of people
- Protocols are in place regarding the movement of employees between production areas. For example, movement into and out of high-risk areas is restricted.
- Employees have been given training regarding the movement protocols and required biosecurity measures. Refer to section 2.0 Education, Training and Communication for more information.
- Post signs at the main entrances and field entry points to advise visitors of the need for permission to access the nursery and to direct them to the appropriate sign-in area.
- Signs include contact information for nursery employees that are authorized to grant access to the nursery. Refer to Appendix 2 for examples of signs.
- Visitors report to the main office or have an employee meet them in a designated area to receive a briefing on the required biosecurity measures.
- Keep a visitors log to identify the date visited, the areas visited and the most recent contact with plant material prior to visiting the nursery. This information may be useful when responding to a pest detection. Please see Appendix 3 for an example of a visitors log.
- Visitors may have visited multiple nurseries or other agricultural facilities prior to arrival. Assess the risk of each visitor and implement the appropriate biosecurity measures such as disposable footwear covers.
- Visitors and employees only access areas that are necessary for their activities.
Movement of vehicles and equipment
- Employees should be trained to know the traffic flow of the nursery. Refer to section 2.0 Education, Training and Communication for more information.
- Visitors and employees park in designated areas.
- Prior to entry into the nursery, assess the risk of vehicles that have been at other nurseries or other agricultural facilities to determine the necessary biosecurity measures. This may include cleaning and disinfecting of the off-farm vehicle or transporting visitors in a designated nursery vehicle.
- Clean on-farm vehicles and sprayers when moved between production areas.
Movement of People, Vehicles and Equipment Self-Assessment Checklist
| Biosecurity Measure | Yes | Sometimes | Never | Not Applicable |
|---|---|---|---|---|
| Protocols are in place regarding the movement of employees between production areas. | ||||
| Employees are trained on movement protocols and required biosecurity measures. | ||||
| Permission is required for visitors to enter the nursery beyond the parking area and main office. | ||||
| Signs at entrances and field entry points direct visitors to the sign-in area. | ||||
| Signs include contact information of employees authorized to grant access. | ||||
| Visitors report to the main office and sign a visitors log prior to entering the nursery. | ||||
| A visitors log is kept to identify the date visited, the areas of the nursery visited and the most recent contact with plant material prior to visiting the nursery. | ||||
| The pest risk of visitors is assessed to determine the required biosecurity measures. | ||||
| Visitors receive information on the required biosecurity measures. | ||||
| Visitors and employees only access areas required to complete their work. |
| Biosecurity Measure | Yes | Sometimes | Never | Not Applicable |
|---|---|---|---|---|
| Employees have been trained and know the flow of vehicles and equipment in the nursery. | ||||
| Visitors and employees park in designated areas. | ||||
| Required biosecurity measures are determined by assessing the pest risk of vehicles that have been to other nurseries. | ||||
| Off-farm vehicles and equipment are cleaned when their entry onto the nursery is required. | ||||
| On-farm vehicles and equipment are cleaned when moved between production areas. |
3.4 Maintenance of Facilities and Property
Maintenance of Facilities and PropertyFootnote 7
Target Outcome
Introduction and spread of pests is limited by keeping buildings and equipment in good repair.
Benefits: Cleaning and maintaining nursery property, buildings and equipment limits the opportunity for pest introduction and spread. Knowledge of pests and pathways of pest transmission can be used to determine the frequency of cleaning and maintenance activities. Depending on the pest, equipment may need to be cleaned between uses on individual trees or between production areas. This knowledge should be used to implement a sanitation program and a maintenance program.
Considerations
- Use a checklist to itemize the required sanitation and maintenance activities.
Maintenance Program
- Implement a routine maintenance program that includes preventive measures and procedures for interior and exterior activities such as the maintenance of structures and production areas.
- Schedule maintenance activities to ensure that each production area is revisited within an appropriate timeline.
- Control weeds and host material for pests of concern around the beds and growing areas. This can be accomplished through mechanical or chemical treatment of non-crop areas and physical barriers, such as gravel or plastic-covered areas.
- Minimize or eliminate areas where pests can enter enclosed production areas such as screenhouses, hoop houses or greenhouses by ensuring holes are fixed, doors close properly and windows can be closed.
- Maintain deer fencing, tree guards, and rodent traps and bait stations to prevent damage.
- Maintain and calibrate spray equipment to provide a uniform and accurate pesticide application.
Sanitation Program
- Implement a sanitation program for cleaning equipment, including the irrigation system.
- Attention should be given to cleaning propagation equipment.
- Clean container production areas between crops, including outdoor production beds, greenhouses and hoop houses.
- When a pest has been detected, specific cleaning protocols for buildings and equipment such as pruners, shears, moving and harvesting equipment may be required to prevent pest spread.
- Strategically sequence work flow to minimize cleaning of equipment.
| Biosecurity Measure | Yes | Sometimes | Never | Not Applicable |
|---|---|---|---|---|
| A checklist is used to itemize the required maintenance and sanitation activities. |
| Biosecurity Measure | Yes | Sometimes | Never | Not Applicable |
|---|---|---|---|---|
| A maintenance program is in place that includes interior and exterior activities. | ||||
| Maintenance activities are scheduled to ensure each field or production area is revisited within an appropriate time. | ||||
| Weeds and host material around production areas are controlled. | ||||
| Screenhouses, hoop houses and greenhouses are maintained to prevent pest entry. | ||||
| Deer fencing is maintained to prevent large animal entry to production areas. | ||||
| Tree guards are maintained to prevent rodent feeding at the base of trees. | ||||
| Traps and bait stations are maintained to minimize rodent populations and prevent damage to stored crops. | ||||
| Spray equipment is regularly maintained and calibrated. |
| Biosecurity Measure | Yes | Sometimes | Never | Not Applicable |
|---|---|---|---|---|
| A sanitation program is in place. | ||||
| Container production areas are cleaned between crops. | ||||
| Specific cleaning protocols are available when a pest is detected. | ||||
| Work flow is strategically sequenced to minimize cleaning. |
4.0 Crop Health Management in Production Stages
4.1 Production Inputs: Purchasing and Receiving
Production Inputs: Purchasing and ReceivingFootnote 8
Target Outcome
Production inputs are not a potential source of pests.
Benefits: Receiving inputs such as propagative material, plants, soil, growing media, water or packaging material from external sources has the potential to introduce pests to the nursery. Pest introduction may be mitigated by evaluating the risks associated with inputs sourced from suppliers and inspecting inputs upon arrival.
All inputs should be inspected upon arrival.
Considerations
- Assess the risks associated with inputs such as soil, growing media and plant material from external suppliers. Purchasing inputs from suppliers that implement biosecurity measures or an Integrated Pest Management (IPM) program may mitigate the risk of pest introduction to a nursery.
- Be aware of the risks associated with imported wood pallets, bamboo stakes and other natural nursery supplies. These inputs should also be inspected prior to entry into the nursery.
- Maintain purchasing records for inputs. Records may include the supplier information, number of plants and date planted. This information can help identify the supplier, other inputs or nurseries that may be affected when responding to a pest detection.
- Inspect all inputs upon entry into the nursery. If pests are present, the inputs should be returned to the supplier, disposed of, or cleaned and disinfected.
- Maintain inspection records. These records can be used to track the product or supplier if a pest is detected.
- Avoid co-mingling of new plants or other inputs entering the nursery with older material and mother stock. For example, use barriers or buffer zones to separate plants.
- If the pest risk of an input is unknown, the product should be considered high risk and placed in the segregation area to be monitored for the presence of pests.
- Assess the risk of recycled water and treat as required. For example, recycled water used for container-grown plants should be tested for water-borne pathogens such as Phytophthora species.
| Biosecurity Measure | Yes | Sometimes | Never | Not Applicable |
|---|---|---|---|---|
| Risks of inputs purchased from external suppliers are assessed. | ||||
| Pest distribution in the location of the supplier is taken into consideration when purchasing plant material. | ||||
| Purchasing records are maintained. | ||||
| Inputs are inspected upon entry into the nursery. | ||||
| Inspection records of inputs are maintained. | ||||
| New plants received from outside sources are not co-mingled with older plants and mother stock. | ||||
| Inputs with an unknown risk level are segregated and monitored for pests. | ||||
| Received plants are separated from finished plants and from propagative material. | ||||
| When a pest is detected in an input, the product is returned to the supplier, disposed of, or cleaned and disinfected. | ||||
| Recycled water is regularly tested and treated as required for nutrients and pests. |
4.2 Crop Production
Crop ProductionFootnote 9
Target Outcome
The combination of Best Management Practices and the implementation of biosecurity measures optimize the production of healthy plants.
Benefits: Healthy plants are better able to withstand pest pressure. The growing conditions required for producing healthy crops will differ between nurseries. Some growing conditions and production practices may also promote the introduction and growth of pests. Implementing biosecurity measures into the production process can help optimize the production of healthy plants.
Considerations
Internal and external environment
- Reduce or manage overall plant stress that can make plants more vulnerable to pests. Plant stress can be caused by:
- Physical injury to plants from equipment or pruning;
- Environmental stress, such as frost damage or water stress;
- Production practices, such as hardening-off, crop density or chemical treatment.
- Protect plants against inclement weather by using shade cloths or blankets.
- Develop and implement a management plan to respond to damage from environmental conditions that cannot be mitigated.
- Growing conditions should be managed to support crop growth while minimizing the crop's susceptibility to pests. Growing conditions such as high humidity can promote the establishment of some pests, for example fungus or mould. In situations where growing conditions may create pest risks, production practices such as increased airflow or increased plant spacing may be considered to minimize potential outbreaks.
- Weeds can harbour pests and spread weed seeds into crops. Manage weeds around the perimeter of the nursery or production areas.
Nutrients, growing media and water management
- Ensure that an adequate fertilizer program is in place, as nutrient-deficient or over-fertilized plants are more vulnerable to pests.
- Soil and growing media may be potential sources of pests. Inspect these inputs upon arrival to nursery and if a pest is present, treatment may be necessary. Treatment options include heat pasteurization, solarization or fumigation.
- Periodically test the nutrient content of irrigation water, as water quality is important for the production of healthy plants.
- Assess the risk of recycled water and treat as required. For example, recycled water used for container-grown plants should be tested for water-borne pathogens such as Phytophthora species.
- Different types of irrigation systems such as flood, drip and overhead irrigation pose different plant health management concerns. Become familiar with common problems posed by the type of irrigation system at the nursery.
Plant material selection
- Assess the risks associated with plant material from external sources. To mitigate the risk of pest introduction, purchase plants from a supplier that implements biosecurity measures such as a Clean Plants certified nursery or that has an Integrated Pest Management (IPM) program in place.
- For propagation activities, purchase certified pest free plant material such as virus-indexed material.
- Choose plants that are appropriate for the growing conditions of the nursery.
- Implement a management plan to prevent the introduction of pests when planting material that is highly susceptible to pests like Phytophthora ramorum or boxwood blight.
Crop protection approaches for commonly occurring pests
- Implement an IPM program. IPM is a decision-making process that takes many factors into account when deciding on a treatment. Regular scouting, weather observations, use of phenological indicators, treatment follow-up, record-keeping and a pesticide resistance management strategyFootnote 10 are all components of a successful IPM program.
- Pest thresholdsFootnote 11 for non-regulated pests may be established to trigger the use of a particular treatment. It should be recognized that what constitutes a threshold is complex, as there are different thresholds for different crops and pests. The threshold may differ depending on whether the objective is to suppress, eradicate or manage the pest.
- Maintain records of applied control measures and the results, as well as the response of natural enemies to help identify conflicts. Impacts of insecticides on the natural enemies of insects can be researched using online databases prior to application. For an example of a pesticide record, please see Appendix 4.
- Be aware of secondary impacts of pest control measures. For example, herbicide applications can be toxic to biological controls.
- Disrupt the lifecycle of pests in field production by using methods such as crop rotation.
Crop Production Self-Assessment Checklist
| Biosecurity Measure | Yes | Sometimes | Never | Not Applicable |
|---|---|---|---|---|
| There is a plan to address injuries to plants from environmental and physical damage. | ||||
| Optimize production conditions to minimize plant stress. | ||||
| Wherever possible, biosecurity measures are applied when growing conditions favour pest introduction and spread. | ||||
| Weeds are managed around the perimeter of the nursery or production areas. |
| Biosecurity Measure | Yes | Sometimes | Never | Not Applicable |
|---|---|---|---|---|
| A fertilizer program is in place. | ||||
| Monitor soil and growing media for pests. | ||||
| Periodically test the nutrient content of water. | ||||
| Test recycled water for pathogens. | ||||
| Knowledge of the impact of the type of irrigation system on pest presence. |
| Biosecurity Measure | Yes | Sometimes | Never | Not Applicable |
|---|---|---|---|---|
| Pest risk associated with plant materials from external suppliers is assessed. | ||||
| Certified pest free plant material is purchased for propagation activities. | ||||
| Plants are selected based on suitability to nursery growing conditions. | ||||
| For highly susceptible plants, a management plan is in place to prevent pest introduction. |
| Biosecurity Measure | Yes | Sometimes | Never | Not Applicable |
|---|---|---|---|---|
| An IPM program has been implemented. | ||||
| Plants are regularly monitored for pests. | ||||
| Weather patterns and phenological indicators are used to predict pest pressures. | ||||
| For non-regulated pests, thresholds are used to trigger control measures. | ||||
| Detailed records of control measures and results are kept. | ||||
| Awareness of secondary impact of control measures. | ||||
| Use past pest management actions to anticipate and avoid future pest issues. | ||||
| Proper rotation of crops is incorporated in the planting schedule. |
4.3 Pest Management Program (Monitoring, Identification, Decisions)
Pest Management Program (Monitoring, Identification, Decisions)Footnote 12
Target Outcome
Minimize production losses through the early detection of pests.
Benefits: A monitoring program allows for the early detection of pests of concern and is essential to determine when pests are about to reach a threshold when control measures may be implemented. Regular monitoring and proper pest identification are the critical first steps in an Integrated Pest Management (IPM) program. A monitoring program will also allow for the assessment of the effectiveness of control measures and production practices. Early detection can help prevent economic impacts from pests.
Considerations
Monitoring
- Adjust the monitoring program during specific times in the production cycle, such as flowering or periods where control measures are more likely to be successful or cost-effective.
- For up-to-date pest information for the area or region, refer to external sources such as weekly pest reports by provincial governments (Ontario Ministry of Agriculture, Food and Rural Affairs [OMAFRA]) or sector associations. This information can be provided to employees by posting the reports in common areas.
- Formal and informal monitoring may be included in the monitoring program and be used to make decisions to implement control measures.
- The frequency of formal monitoring is dependent on multiple factors such as season, crop and pest.
- Informal monitoring should include the inspection of new plant material when it arrives at the nursery.
- Maintain records of formal monitoring activities, especially pest detections. Records can be used to predict times of pest occurrence. Records may include date, crop, Growing Degree-Days (GDD), phenological indicators, pest, symptoms observed, timing of symptoms, possible causes, control measures and the success of the control measures.
- Record-keeping of informal monitoring may not be necessary.
- A trained employee may be assigned to review monitoring records from previous years to prepare a pest management plan for the next growing season.
Identification
- Provide employees with fact sheets for pests of concern or information sheets that explain how to identify pests of concern. Posters may be hung in common areas to help employees identify pests of concern such as boxwood blight or Japanese beetle.
- All levels of employees are informed of the process to report suspected pest detections to designated employees at the nursery.
- Not all employees require training on all biosecurity measures such as pest identification or pest control measures. Refer to section 2.0 Education, Training and Communication for further information on training and communication of a biosecurity plan.
- Trained employees may need access to resources such as books, online resources, provincial or associated specialists and consultants to assist in pest identification, as well as developing and implementing pest response plans.
Decisions
- Pest response plans have been developed to make pest control decisions.
- A designated employee should be trained to decide the timing of control measures and to assess the success of control measures.
- Trained, designated employees should be aware of the reporting process when a regulated pest is detected and have access to the contact information for the Canadian Food Inspection Agency (CFIA).
Pest Management Program (Monitoring, Identification, Decisions) Self-Assessment Checklist
| Biosecurity Measure | Yes | Sometimes | Never | Not Applicable |
|---|---|---|---|---|
| The monitoring program is adjusted accordingly during highly susceptible time periods within the production cycle of crops. | ||||
| Up-to-date pest information from external sources is collected and made available to employees. | ||||
| Plants are regularly monitored for pests. | ||||
| Knowledge of pest biology and historical information on the timing of pest occurrence is used to schedule monitoring. | ||||
| Detailed records of monitoring activities are maintained. | ||||
| Monitoring information is reviewed and used to make pest management decisions. |
| Biosecurity Measure | Yes | Sometimes | Never | Not Applicable |
|---|---|---|---|---|
| Pest fact sheets or identification sheets are available to employees. | ||||
| Employees have been instructed to inform designated employees if a pest is detected. | ||||
| Designated employees oversee the pest management plan. | ||||
| Information sources that describe pest identification and life cycles are accessible to employees. | ||||
| Experts are consulted if the identity of a pest is unknown. |
| Biosecurity Measure | Yes | Sometimes | Never | Not Applicable |
|---|---|---|---|---|
| A pest management plan is in place. | ||||
| A designated employee has been trained to decide and assess the success of control measures. | ||||
| The result of control measures is reviewed. | ||||
| Update the IPM plan as required. | ||||
| Knowledge of the regulated pests present in the area and of the associated requirements following detection. |
4.4 Shipping and Production Outputs
Shipping and Production OutputsFootnote 13
Target Outcome
Finished product leaving the place of production is free of pests of concern.
Production wastes are managed, treated and disposed of to reduce the risk of spreading pests.
Benefits: Managing outputs, finished product and waste mitigates the potential risk of pest introduction and spread from a nursery to neighbouring nurseries, the surrounding landscape, and to areas where the product may be received. In addition, detecting pests in the finished product may indicate potential pest issues in the field that may require a response.
For the same reason plants are inspected upon arrival, plants should be inspected prior to shipping.
Considerations
Shipping finished product
- Effective crop maintenance and health management is essential for shipping a high quality finished product that is free of pests of concern. Refer to section 4.2 Crop Management for further information.
- Implement a traceability system that facilitates both trace-forward and trace-back activities for finished product in the event of a pest detection once finished product has left the nursery.
- The following information can be recorded to help with trace-forward or trace-back if a pest is detected in the production area or the finished product after it has left the nursery:
- What is the source of the finished product?
- How long have the plants been in production at the nursery?
- What is the destination of the finished product?
- What pests are present or not present at the destination?
- What counties, provinces or states will the finished product transit through to arrive at the final destination?
- Are there permits or declarations required to ship the finished product?
- Appendix 5 is an example from the Clean Plants Nursery Manual of the information and records to collect that support traceability activities.
- Prior to shipping, inspect the finished product for pests of concern.
- Record the inspection information and include the date, name of employee, crop, findings, source and customer.
- Inspect trucks and shipping containers for pests and organic debris prior to loading the finished product. If cleaning is required, assess the potential for pest introduction or spread to the nursery depending on the risks associated with the debris or pests present.
Production waste
- Locate compost piles away from the production area(s).
- To prevent the infestation of other crops, assess the pathways of pest transmission when disposing of infested plant material. For example, if the pest is spread by wind, the infested material may be disposed of by deep burial, transportation to a municipal disposal facility or other methods that minimize the risk of pest spread and introduction. Producers should also be aware of any provincial waste management regulations that may apply.
- Recycled pots and plastic containers should be cleaned prior to re-use to mitigate the potential for pest spread.
Shipping and Production Outputs Self-Assessment Checklist
| Biosecurity Measure | Yes | Sometimes | Never | Not Applicable |
|---|---|---|---|---|
| Effective plant maintenance and health management is used to produce a high-quality finished product. | ||||
| A traceability system is in place that facilitates both trace-forward and trace-back for finished product. | ||||
| Finished product is inspected prior to shipping. | ||||
| Inspection information is recorded. | ||||
| The truck or shipping container is inspected prior to loading finished product. | ||||
| The risk of pest introduction is assessed before cleaning trucks or shipping containers. |
| Biosecurity Measure | Yes | Sometimes | Never | Not Applicable |
|---|---|---|---|---|
| Compost piles are located away from production areas. | ||||
| The pathway of pest transmission is assessed when infested material is disposed of to prevent pest spread. | ||||
| Recycled pots and plastic containers are cleaned before use. |
4.5 Responding to a Pest
Responding to a PestFootnote 14
Target Outcome
An Integrated Pest Management (IPM) program is developed to respond to common pests. Formal response plans are created for pests of greater concern.
Benefits: When a pest is detected, there is a decision-making process to determine if a response is required, the timing of the response and the identification of the most appropriate control measures. When a pest is found, there are factors that may be considered to decide if control actions are necessary. These factors include the level of pest infestation, the impact of the pest on crop growth, the stage in the production cycle, and the time of year. Control measures may not always be required as not all pests carry the same risk. An Integrated Pest Management (IPM) program is an important aspect of early pest detection but also plays a critical role in responding to a pest. Creating a pest management plan and formal response plans involves analyzing the pest risk to determine the level of response required. Preparing detailed response plans prior to the identification of a pest may facilitate an effective and timely response which may reduce production losses.
The considerations outlined below in Non-regulated pests may also apply to the response to a regulated pest find. However, a regulated pest find may require specific actions that are provided by the Canadian Food Inspection Agency (CFIA).
Considerations
Non-regulated pests
- Prepare an IPM program that includes responses to pest detections. The response should include confirmation of pest identification, determination of pest risk, determination of pest thresholds that would require control measures and potential control measures.
- Confirmation of pest identification by designated employees, laboratories, extension specialists, consultants, researchers and the CFIA.
- Increased monitoring may be necessary when a pest is detected to quantify the level of infestation or assess the effectiveness of control measures.
- Pests introduced to a nursery through imported plants or cuttings may already be resistant to pesticides available in Canada. When resistance is encountered, consider alternative control measures such as biological control.
- Consult provincial production guides for control measures, treatments and chemicals that can be applied to respond to a pest detection.
- Periodically assess the effectiveness of the IPM program to foster continuous improvement and efficiencies.
- Potential pest spread is mitigated by controlling or restricting the movement of plant material, people and equipment in and out of the infested area.
- To limit the spread of pests, infested plant material should not be mixed or come in contact with other plants.
- When a pest is detected, management of shipping activities may be necessary to help mitigate the spread of the pest. For example, infested or potentially infested plant material may not be shipped.
Regulated pests
- When a regulated pestFootnote 15 is identified, contact the CFIA to report the detection.
- Include in the response plan the contact information for the local CFIA office.
- If the detection of a regulated pest is suspected, limit potential pest spread by controlling or restricting the movement of plant material, people and equipment in and out of the infested area.
Responding to a Pest Self-Assessment Checklist
| Biosecurity Measure | Yes | Sometimes | Never | Not Applicable |
|---|---|---|---|---|
| An IPM program has been prepared that includes responses to pest detections. | ||||
| Pest responses include confirmation of pest identification, determination of pest risk, determination of pest levels that would require control measures and potential control measures. | ||||
| Pest identification is confirmed by designated employees, laboratories, extension specialists, consultants, researchers or the CFIA. | ||||
| Monitoring is enhanced when a pest is detected. | ||||
| Monitoring is enhanced to assess the effectiveness of applied control measures. | ||||
| When pesticide resistance is encountered, alternative control methods are considered. | ||||
| External sources are consulted for control actions, treatments and chemicals that can be applied to respond to a pest detection. | ||||
| New chemicals are assessed for efficacy and crop tolerance prior to broad use in the nursery. | ||||
| The effectiveness of the IPM program is periodically assessed and updated as necessary. | ||||
| Movement in and out of the infested area is controlled or restricted. | ||||
| Infested plant material does not come into contact or mixed with other product. | ||||
| When necessary, shipping activities are managed to prevent pest spread. |
| Biosecurity Measure | Yes | Sometimes | Never | Not Applicable |
|---|---|---|---|---|
| The CFIA is contacted when a regulated pest is suspected or identified. | ||||
| The response plan includes contact information for the local CFIA office. | ||||
| Potential pest spread is mitigated by controlling or restricting the movement of plant material, people and equipment in and out of the infested area. |
5.0 Conclusion
This Nursery Sector Biosecurity Guide together with the National Voluntary Farm-Level Biosecurity Standard for the Greenhouse, Nursery and Floriculture Sectors provide producers with a nationally consistent approach to develop and implement a biosecurity plan. The Nursery Sector Biosecurity Guide Self-Assessment Checklist and Action Work Plan has been provided to help producers determine additional biosecurity measures that can be applied to a nursery. A nationally consistent approach to the application of biosecurity measures can help mitigate the risk of pest introduction and spread within Canada.
6.0 Glossary
- Advanced biosecurity measure:
For the purpose of this Guide, an advanced biosecurity measure is considered essential to achieve a higher level of biosecurity in a nursery, which may help to increase the mitigation of pest introduction and spread.
- Biological control:
Often referred to as "biocontrols". Biological pest control is the method of controlling pests (including insects, mites, weeds and plant diseases) using other living organisms. It relies on predation, parasitism, herbivory or other natural mechanisms, but typically also involves an active human management role. It is often an important component of Integrated Pest Management (IPM) programs.
- Biosecurity:
A set of practices used to minimize the transmission of pests including their introduction (bioexclusion), spread (biomanagement), and release (biocontainment).
- Controlled Access Zone (CAZ):
An area(s) within a nursery where access is restricted or otherwise controlled to prevent pest movement into or out of the area.
- Formal monitoring:
A planned systematic process to detect and quantify pests that is conducted by a trained scout.
- High-risk area:
An area that requires additional biosecurity measures to prevent pest spread either into or out of it.
- Infest:
A plant is considered infested when a pest is detected on it. Please note this Guide defines a pest as any living organism injurious to plants, plant products or by-products, including insects, mites, diseases, vermin, animals and weeds.
- Informal monitoring:
Regular monitoring that is performed by any trained nursery employee to detect pests.
- Input:
The resources that are used in greenhouse, nursery or floriculture production, such as chemicals, equipment, fertilizer, seed and plant material.
- Integrated Pest Management (IPM):
IPM is a process for planning and managing sites to prevent pest problems and for making decisions about when and how to intervene when pest problems occur. It is a sustainable approach, combining biological, cultural, physical and chemical tools to manage pests so that the benefits of pest control are maximized and the health and environmental risks are minimized.
- Maintenance:
Involves unscheduled and routinely scheduled activities to fix any area of the nursery, device or equipment should it become out of order or broken.
- Non-regulated pest:
For the purpose of this Guide, a non-regulated pest includes any new pest or pest of concern that is not regulated.
- Output:
Includes waste, garbage and finished product.
- Pest:Footnote 16
Any living organism injurious to plants, plant products or by-products, including insects, mites, diseases, vermin, animals and weeds.
- Restricted Access Zone (RAZ):
An area, generally located inside the controlled access zone, where access by people or equipment is further restricted, providing an extra level of protection.
- Routine biosecurity measure:
For the purpose of this Guide, a routine biosecurity measure is considered essential to achieve a minimum or basic level of biosecurity.
- Sanitation:
Activities to maintain clean equipment and machinery, including the irrigation system.
- Segregation area:
An area used to separate and store plants, which pose a concern of spreading a pest, from other plants in production as a precautionary measure.
- Vector:
A biological, physical or environmental agent that disperses a crop pest.
- Vermin:
Wild and usually small animals such as rodents, which are harmful to crops or farm animals or which carry disease.
- Visitor:
Includes service providers, shippers, consultants, federal and provincial inspectors, delivery personnel, utility providers such as electricians and plumbers, IPM specialists, extension specialists and others entering the nursery that are not considered an employee.
Appendix 1: Example of a Risk Assessment Tool
Example of a Risk Assessment ToolFootnote 17
The following questions examine the potential to introduce or spread a new serious pest. Consider every risk situation and identify whether the risk for your operation would be low (L), medium (M) or high (H). Answers provided are suggestions only.
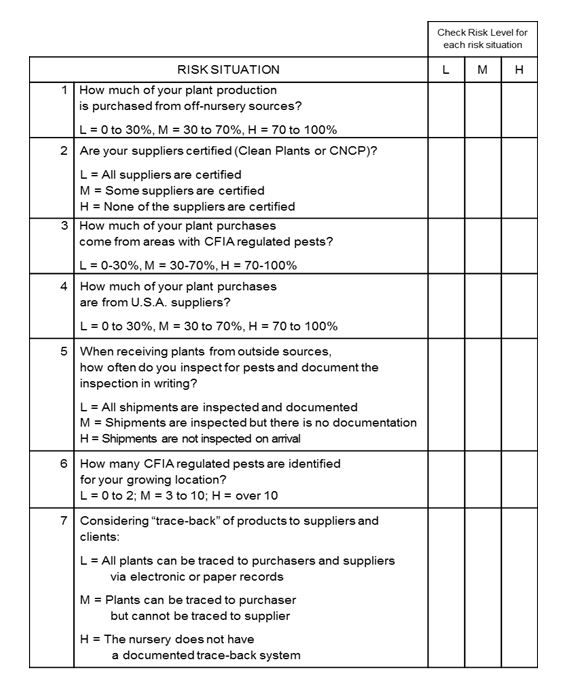
Description for photo - Example of a Risk Assessment Tool
A table with three main columns. From left to right, the first column does not have a heading and the rows below it are filled with numbers to denote each risk situation listed in the second column. The heading of the second column says: Risk Situation. The heading of the last column says: Check risk level for each risk situation. The last column is divided into three sub-columns. From left to right the headings are L, M, H. Under the Risk Situation heading there are seven rows that each contain text stating a risk situation. The first risk situation states: How much of your plant production is purchased from off-nursery sources? L = 0% to 30%, M = 30 to 70%, H = 70 to 100%. The second risk situation states: Are your suppliers certified (Clean Plants or CNCP)? L = All suppliers are certified, M = Some suppliers are certified, H = None of the suppliers are certified. The third risk situation states: How much of your plant purchases come from areas with CFIA regulated pests? L = 30%, M = 30 – 70%, H = 70 – 100%. The fourth risk situation states: How much of your plant purchases are from U.S.A. suppliers? L = 0 to 30%, M = 30 to 70%, H = 70 to 100%. The fifth risk situation states: When receiving plants from outside sources, how often do you inspect for pests and document the inspection in writing? L = All shipments are inspected and documented, M = Shipments are inspected but there is no documentation, H = Shipments are not inspected on arrival. The sixth risk situation states: How many CFIA regulated Pests are identified for your growing location? L = 0 to 2, M = 3 to 10, H = over 10. The seventh risk situation states: Considering "trace-back" of products to suppliers and clients: L = All plants can be traced to purchasers and suppliers via electronic or paper records, M = Plants can be traced to purchaser but cannot be traced to supplier, H = The nursery does not have a documented trace-back system.
Appendix 2: Examples of Biosecurity Signs
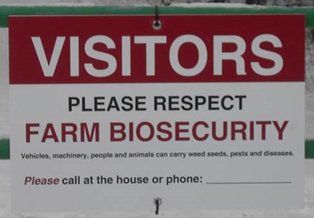
Description for photo - A photo of a square biosecurity sign on a gate.
A photo of a square biosecurity sign on a gate in front of a driveway. The sign states: Visitors, please respect farm biosecurity. Vehicles, machinery, people and animals can carry weed seeds, pests and diseases. Please call at the house or phone. After this statement a line is provided for a contact number.
Photo: Courtesy of Susan Fitzgerald, Ontario Livestock and Poultry Council
Description for photo - A photo of a biosecurity sign on a gate.
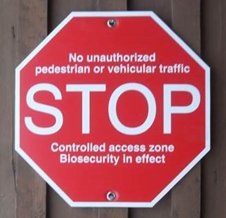
A photo of a biosecurity sign in the shape of an octagon on a gate. The middle of the sign says Stop. Above the word Stop states: No unauthorized pedestrian or vehicular traffic. Below the word Stop states: Controlled access zone. Biosecurity in effect.
Photo: Courtesy of Susan Fitzgerald, Ontario Livestock and Poultry Council
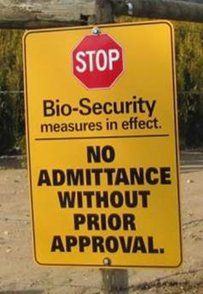
Description for photo - A biosecurity sign on a post in a field.
A biosecurity sign on a post in a field. There is a picture of a stop sign at the top of the biosecurity sign. Below the stop sign states: Biosecurity measures in effect, No Admittance without prior approval.
Photo: Courtesy of Mario Lanthier, CropHealth Advising & Research
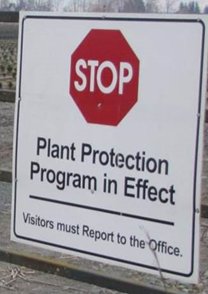
Description for photo - A biosecurity sign attached to a gate in a field.
A biosecurity sign attached to a gate in a field. The top of the biosecurity sign has a picture of a stop sign. Below the stop sign there is text that states: Plant Protection Program in Effect, Visitors must Report to the Office.
Photo: Courtesy of Mario Lanthier, CropHealth Advising & Research

Photo: Courtesy of Jeanine West, Phytoserv

Photo: Courtesy of Mario Lanthier, CropHealth Advising & Research
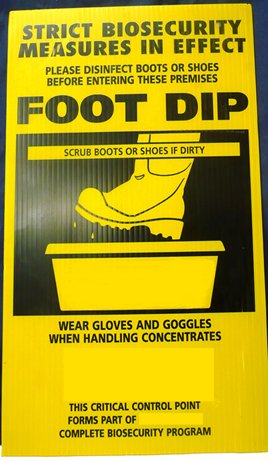
Description for photo - A photo of a yellow biosecurity sign.
A photo of a yellow biosecurity sign with a drawing of a boot being put into a wash container in the middle of the sign. Across the drawing of the boot states: Scrub boots or shoes if dirty. Above the boot states: Strict biosecurity measures in effect. Please disinfect boots or shoes before entering these premises. Foot Dip. Below the boot states: Wear gloves and goggles when handling concentrates. This critical control point forms part of complete biosecurity program.
Photo: Courtesy of Mario Lanthier, CropHealth Advising & Research
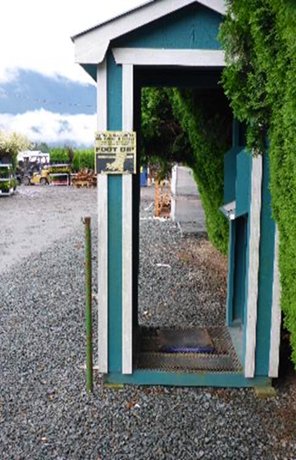
Description for photo - A picture of a small shed at the entrance to a nursery.
A picture of a small shed with an opening for an entrance and exit. The small shed is located to the side of a driveway that leads to a parking lot of a nursery. On the left side of the entrance to the small shed is a foot dip sign. It is the same sign that is shown in the picture above. On the floor of the shed is a footbath.
Photo: Courtesy of Mario Lanthier, CropHealth Advising & Research
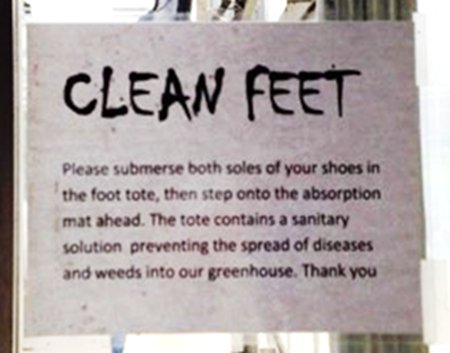
Description for photo - A picture of a small shed at the entrance to a nursery.
A photo of a sign on a glass door. The sign states: Clean Feet. Please submerse both soles of your shoes in the foot tote, then step onto the absorption mat ahead. The tote contains a sanitary solution preventing the spread of diseases and weeds into our greenhouse. Thank you.
Photo: Courtesy of Jeanine West, PhytoServ
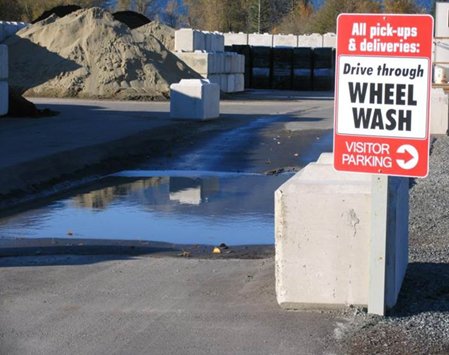
Description for photo - A photo of a biosecurity sign on a post in front of a driveway leading into a parking lot.
A photo of a biosecurity sign on a post in front of a driveway leading into a parking lot. Across the driveway is a puddle of wheel wash solution. The sign states: All pick-ups and deliveries: Drive through wheel wash. Below this there is an arrow pointing right. To the left of the arrow is the statement: Visitor parking.
Photo: Courtesy of Mario Lanthier, CropHealth Advising & Research
Appendix 3: Example of a Visitors Log
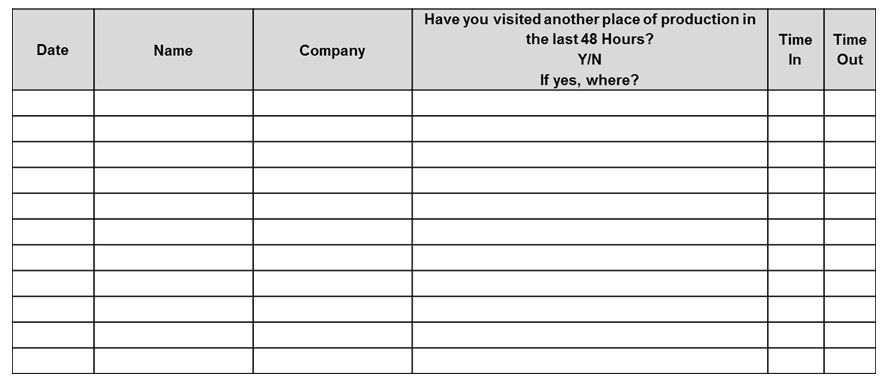
Description for photo - Example of a Visitors Log.
A table of six columns with multiple blank rows. Each column has a heading. From left to right, the heading of the first column is: Date. The heading of the second column is: Name. The heading of the third column is: Company. The heading of the fourth column is: Have you visited another place of production in the last 48 Hours? Y/N, If yes, where? The heading of the fifth column is: Time In. The heading of the sixth is: Time Out
Appendix 4: Example of Pesticide Application Record
Example of Pesticide Application RecordFootnote 18
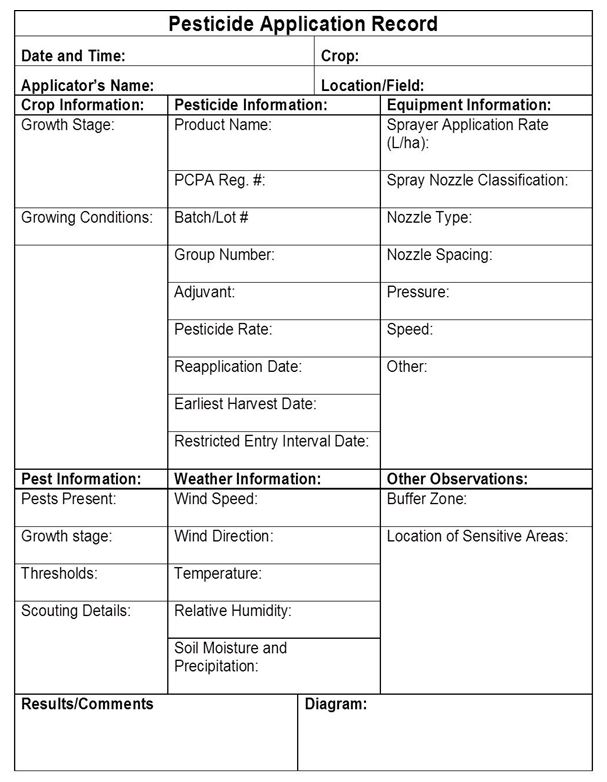
Description for photo - Example of Pesticide Application Record.
The Pesticide Application Record is a form with four boxes at the top. The text in the box located at the top left states: Date and Time. Below this, is another box with text that states: Applicator's Name. The text in the box located to the top right states: Crop. Below this box is a box with text that states Location/Field. Each box has an area to record the required information. Below this section are three columns. From left the right the heading of the first column is Crop Information. Under this heading within the column are two boxes with text. The text in the first box states: Growth Stage. The text in the box below this, states: Growing Conditions. In each of the boxes there is an area below the text to record the required information. The heading of the second column is Pesticide Information. Below this heading there are nine boxes with text and an area to record the required information. From top to bottom the text in the boxes state: Product Name, PCPA Reg. #, Batch/Lot #, Group Number, Adjuvant, Pesticide Rate, Reapplication Date, Earliest Harvest Date, and Restricted Entry Interval Date. The heading of the third column is Equipment Information. Below this heading there are seven boxes with text and an area to record the required information. From top to bottom the text in the boxes state: Sprayer Application Rate (L/ha), Spray Nozzle Classification, Nozzle Type, Pressure, Speed, and Other. Below these three columns is another section with that is divided into three columns. From left to right the heading of the first column is Pest Information, the second is Weather Information and the third is Other Observations. The Pest Information column is divided into four boxes with text and an area to record the required information. Beginning at the top of this column, the text in the boxes states: Pests Present, Growth Stage, Thresholds, and Scouting Details. The second column, Weather Information, is divided into five boxes with text and an area to record the required information. Beginning at the top of the column, the text in the boxes states: Wind Speed, Wind Direction, Temperature, Relative Humidity, and Soil Moisture and Precipitation. The third column, Other Observations, is divided into two boxes with text and an area to record the required information. Beginning at the top of the column, the text in the boxes states: Buffer Zone and Location of Sensitive Areas. Below these three columns are two boxes. The text in the first box states: Results/Comments. The second box has text that states: Diagram. Both boxes have areas to record the required information.
Appendix 5: Example of Traceability Information and Documents
Example of Traceability Information and DocumentsFootnote 19
Clean Plants Standard Quick Reference
Review this table to ensure all required information was entered into the Nursery Manual. For a comprehensive list of requirements, consult the document Clean Plants Standard.
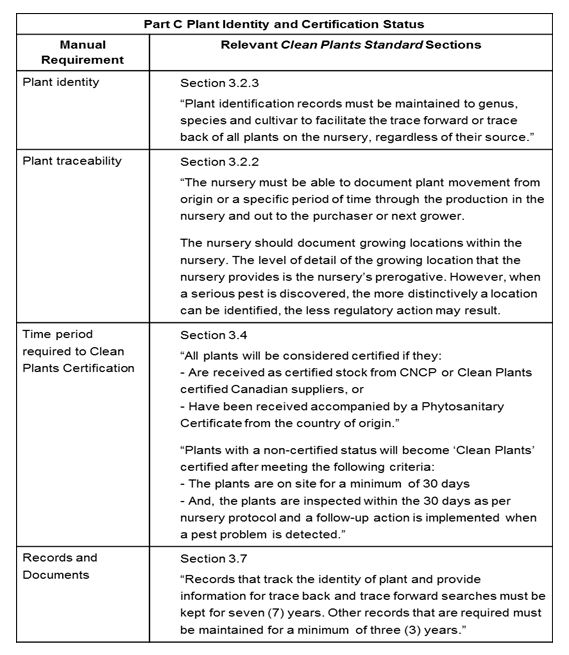
Description for photo - Example of Traceability Information and Documents.
At the top of the table is a row with title of the table. The text in the row states: Part C Plant Identity and Certification Status. Below this row are two columns. From left to right the first column has a heading that states: Manual Requirement. The second column has a heading that states: Relevant Clean Plants Standard Sections. Under these headings are four rows with text. These rows list the manual requirement in the first column and the relevant Clean Plants Standard Sections in the second. From top to bottom, stating the manual requirement first, the text in the four rows states the following:
Plant identity – Section 3.2.3, "Plant identification records must be maintained to genus, species and cultivar to facilitate the trace forward or trace back of all plants on the nursery, regardless of their source."
Plant traceability – Section 3.2.2, "The nursery must be able to document plant movement from origin or a specific period of time through the production in the nursery and out to the purchaser or next grower. The nursery should document growing locations within the nursery. The level of detail of the growing location that the nursery provides is the nursery's prerogative. However, when a serious pest is discovered, the more distinctly a location can be identified, the less regulatory action may result."
Time period required to Clean Plants Certification – Section 3.4, "All plants will be considered certified if they: are received as certified stock from CNCP or Clean Plants certified Canadian suppliers, or have been received accompanied by a Phytosanitary Certificate from the country of origin.", "Plants with a non-certified status will become 'Clean Plants' certified after meeting the following criteria: the plants are on site for a minimum of 30 days, and, the plants are inspected within the 30 days as per nursery protocol and a follow-up action is implemented when a pest problem is detected."
Records and documents – Section 3.7, "Records that track the identity of plant and provide information for trace back and trace forward searches must be kept for seven (7) years. Other records that are required must be maintained for a minimum of three (3) years."
Appendix 6: List of Resources
Documents provided by sector associations
C. buxicola Certification Program – Canadian Nursery Certification Institute (CNCI)
Clean Plants Standard 2.0 version January 2013 – Canadian Nursery Certification Institute (CNCI)
Guide to Nursery and Landscape Production – Ontario Ministry of Agriculture, Food and Rural Affairs (OMAFRA)
Integrated Pest Management: A Framework for Pest Management in Nursery Crop Production – Landscape Ontario (LO)
Nursery Production Guide – British Columbia Landscape and Nursery Association (BCLNA)
P. ramorum Nursery Certification Program – Canadian Nursery Certification Institute (CNCI)
Documents provided by the Canadian Food Inspection Agency
The National Farm-Level Biosecurity Planning Guide
Canadian Fruit Tree Export Program (CFTEP) for Malus, Pyrus, Chaenomeles, Cydonia and Prunus spp. (Directive D-08-05)
Canadian Growing Media Program, prior approval process and import requirements for plants rooted in approved media (D-96-20)
Canadian Nursery Certification Program (D-04-01)
Phytosanitary requirements to prevent the spread of Japanese beetle, Popillia japonica, in Canada and the United States (D-96-15)
Plant Protection export certification program for grapevine nursery stock, Vitis spp. (D97-06)
For a complete list of plant health directives related to the domestic movement of nursery material, please refer to the Canadian Food Inspection Agency website.
Documents provided by Federal Government
Organic Production Systems – General Principles and Management Standards – Public Works and Government Services Canada (PWGSC)
Appendix 7: Acknowledgements
- British Columbia Landscape and Nursery Association (BCLNA)
- British Columbia Ministry of Agriculture (BCMA)
- Canadian Nursery Landscape Association (CNLA)
- Fédération interdisciplinaire de l'horticulture ornementale du Québec (FIHOQ)
- Landscape Alberta (LA)
- Landscape Ontario (LO)
- New Brunswick Department of Agriculture, Aquaculture and Fisheries (NBDAAF)
- PhytoServ
- Date modified: